Thursday, November 28, 2013

Debugging tools and techniques in development mode

I’ve been spending a lot of time answering questions on Stack Overflow lately. From what I read, most of the questions come from unexperienced developers(which am also..).

As practising good debugging techniques and tools helps you solve your problem at once.  Here are few of the mentions which I personally follow.

The basics :

When working with Ruby on Rails you will have to learn a lot of stuff to master debugging your own application. There are so many moving parts in a Rails app, it’s not just MVC…
  • Views (Partials, Layouts, Templating-Engines)
  • Controllers (Actions, Filter)
  • Models (Relations, AREL, Callbacks, Database-Systems)
  • Mailers
  • Routes (REST, HTTP-Verbs, Constraints)
  • Environments and Initializers
  • Caching (Redis, Memcached)
  • Assets (CSS, SASS, JavaScript, CoffeeScript, Pipelining)
  • Bundler and dependency management
  • Tests (RSpec, Capybara)
  • gems, plugins and engines used in the app

Because of this overwhelming complexity, it is very difficult to keep in mind all the stuff and the flow of actions happening. Better way is to say Halt and let me see what are you upto.

Using rake:

Rake was intended as a Make for Ruby. It’s basically a build-tool that handles tasks. So make sure you know when it can be useful for you! The basic commands are  rake -T  to get a list of public commands and  `rake -D to get the full description of the tasks. If one of the commands fail, you can pass the --trace option to see what rake is doing under the hood and find possible error causes.
Here is a list of useful commands that I use when running into strange errors during development:

1
2
3
4
5
6
rake routes
rake middleware
rake assets:clobber
rake assets:clean
rake tmp:clear
rake log:clear

Reading stack-traces:

Reading traces means you have to be Bond - James Bond by nature B-)
Traces leads you to the root cause or atleast to the cause which is making the code fail (thats what detective do in their day-to-day life). Providing meaningful error messages is one of most neglected parts in writing maintainable software. You should always read the errors and stack-traces because they contain helpful information like the source file and the line number where an error was caused. It even provides information about the context, like the calling object and the call-stack when the error happened.
Let me give you an example exception:

1
2
3
4
5
undefined local variable or method `role' for #<Cucumber::Rails::World:0xc4722f8> (NameError)
  ./features/step_definitions/event_steps.rb:10:in `create_visitor'
  ./features/step_definitions/event_steps.rb:14:in `create_user'
  ./features/step_definitions/kid_steps.rb:107:in `/^I am exists as a parent$/'
  features/manage_kids.feature:11:in `And I am exists as a parent'

What I can see at a glance:
  • it’s about cucumber
  • we are in a step definition
  • the context object is of class Cucumber::Rails::World
  • there should be a role but it is not available
  • calling create_visitor caused this error
  • the source of create_visitor is in event_steps.rb on line 10
The source code that matches this error is this:

1
2
3
4
5
6
7
8
9
# event_steps.rb
def create_visitor
  @visitor ||= { 
    :email => "user@example.com",
    :password => "test123", 
    :password_confirmation => "test123", 
    :role => Role.find_by_name(role.to_s) # this is line 10
  }
end

It is just an excerpt of the code, so it’s a good idea to add real line-numbers or an anchor so other people know where we are. In this example, this would not even be necessary, because role is only called once. Without knowing anything about the source, I can immediately see that the author wanted to use something that is not there.
So possible solutions to this might be to use @role or maybe @visitor.role or to have a method called role or pass it in as a parameter to that method. If the test has run successfully before doing any changes, the error was probably introduced by some changes you did and should be easy to find.
So always make sure your test suite passes before writing new code.

Side Note:

Never throw away exception information unless there is a good reason! Swallowing exceptions causes a lot of pain for people that have to maintain the running application, so please at least log the error message when you rescue from something.

Reading code:

One of the key skills for writing code is reading code in the first place. Whether it is code I wrote some time ago, code of my coworkers or library code. It’s super important to understand the code at hand and the code that my application is executing. Compared to other languages, where one has to deal with compiled sources, it’s incredibly easy to have a look at ruby sources. I often run bundle open some_gem to look at the source or when you are not using bundler run gem env and look at GEM PATHS where your gems are installed

1
2
3
4
5
6
7
8
9
10
11
gem env
 
RubyGems Environment:
  - RUBYGEMS VERSION: 2.1.5
  - RUBY VERSION: 2.0.0 (2013-06-27 patchlevel 247) [x86_64-darwin12.4.0]
  [...]
  - GEM PATHS:
     - /Users/paule/.rbenv/versions/2.0.0-p247/lib/ruby/gems/2.0.0
  [...]
 
subl ~/.rbenv/versions/2.0.0-p247/lib/ruby/gems/2.0.0/gems/rails-4.0.0/

Debugging the running server:

I sit in front of the browser and reload the page to see if something happens… Unluckily it does not work the way I expected, so what to do next?

Find it in the logs..

When I am working on a Ruby or Rails application i like to run stuff in terminator with split views. One session for running spec, rails or the console and one session with the corresponding logs with tail -f log/development.log

Screen Shot 2013-10-16 at 10.22.00

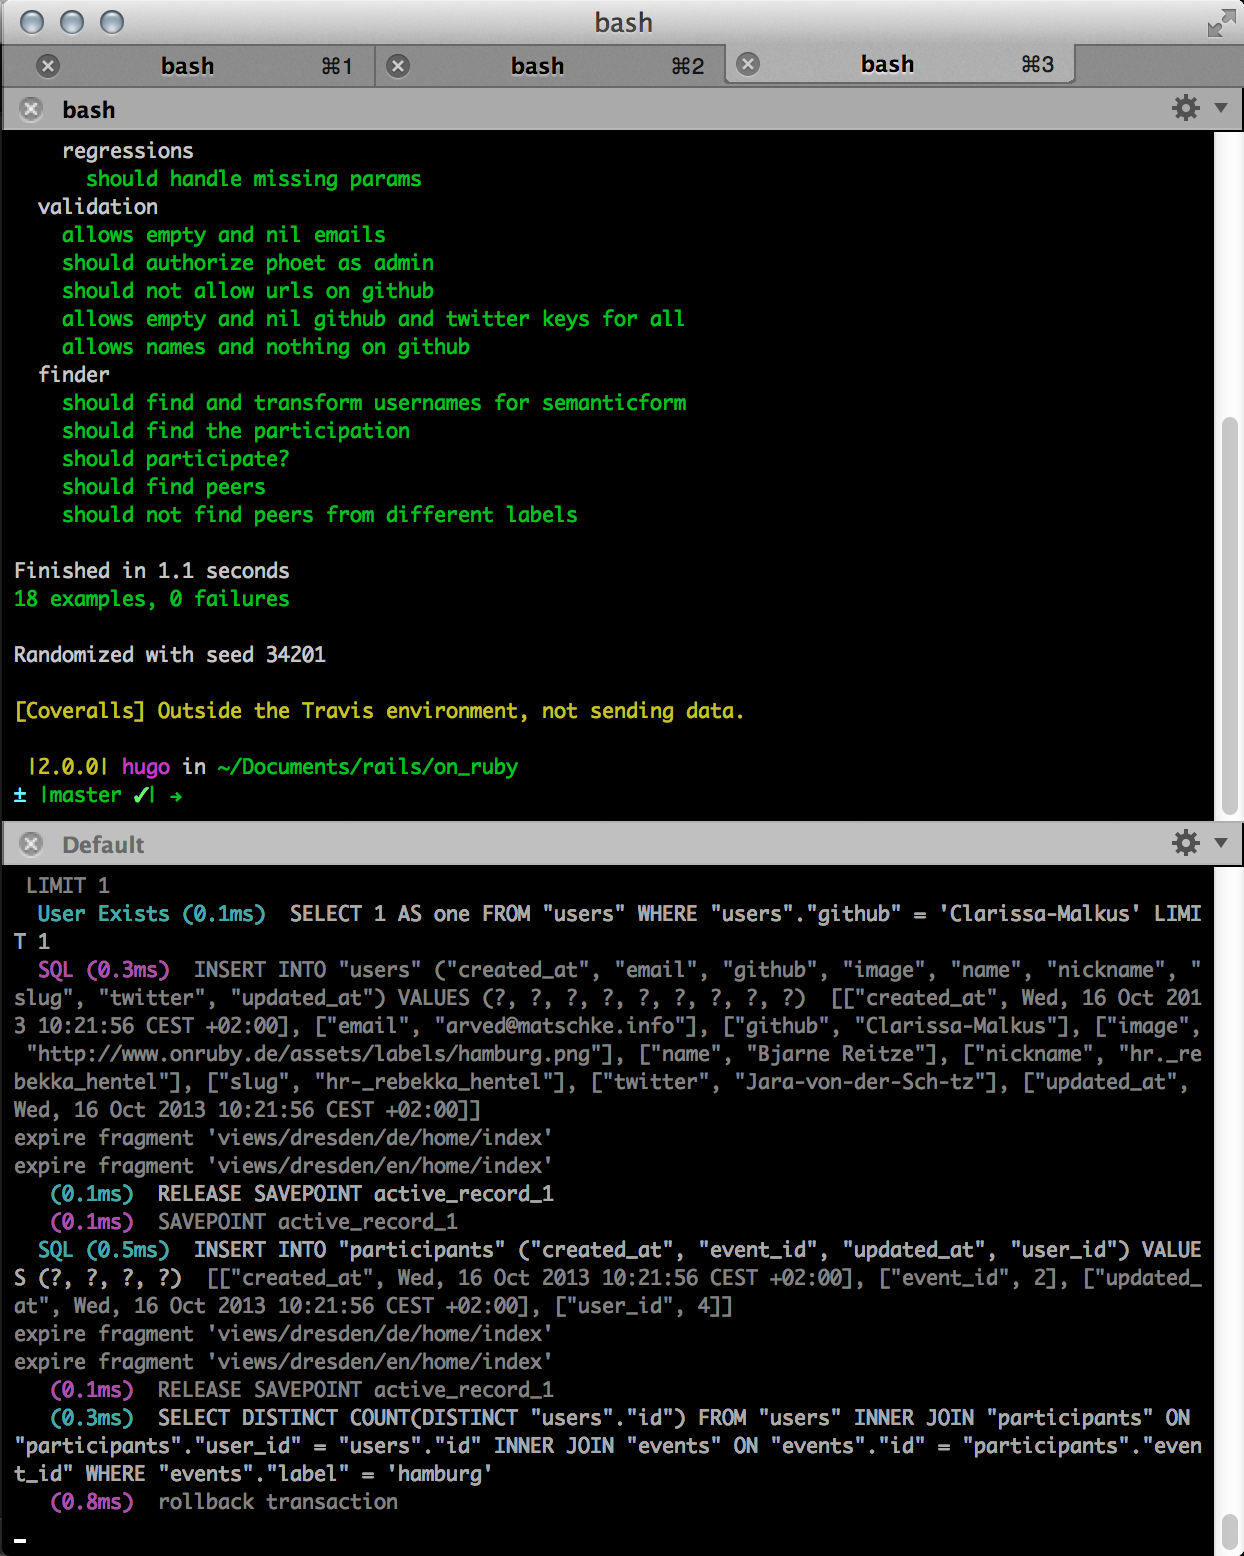
Logs help with a lot of stuff and are a powerful tool to debug your running code. Things that can be extracted from the logs:
  • direct error information
    • error-messages
    • complete stack-traces
    • logged warnings or errors (attribute accessible warnings, deprecations)
  • context information
    • request parameters
    • request types (html, json, xhr…)
    • response codes
    • sql queries
    • rendered views and partials
    • callback informations
Since Rails introduced the asset pipeline, logs became pretty useless, because they were cluttered with asset calls. Disabling those logs does not need any ugly middleware monkey patches anymore because you can use the quiet_assets gem for this purpose!
One thing to pimp the logs to be even more useful is to use the tagged logger that was introduced in Rails 3.2. It allows you to put even more context information into the log like the session-id and request-id:

1
2
3
4
5
6
7
# application.rb
config.log_tags = [
  :host,
  :remote_ip,
  lambda { |request| "#{request.uuid}"[0..15] },
  lambda { |request| "#{request.cookie_jar["_on_ruby_session"]}"[0..15] },
]

Quick inspects:

There are a couple of “workflows” which I tend to use in my everyday debugging, starting with simply adding p some_object, puts some_object.inspect or logger.debug some_object calls randomly to the code. For view templates i use = debug(some_object).

This helps in about 50% of the error cases because it gives me enough context to find the problem quickly.

Another thing is putting a raise some_object.to_s into the code. This is especially helpful if I want to find out when and how some part of the code is executed. Callbacks are a good example where this is a nice shorthand method for debugging.

Insight tools:

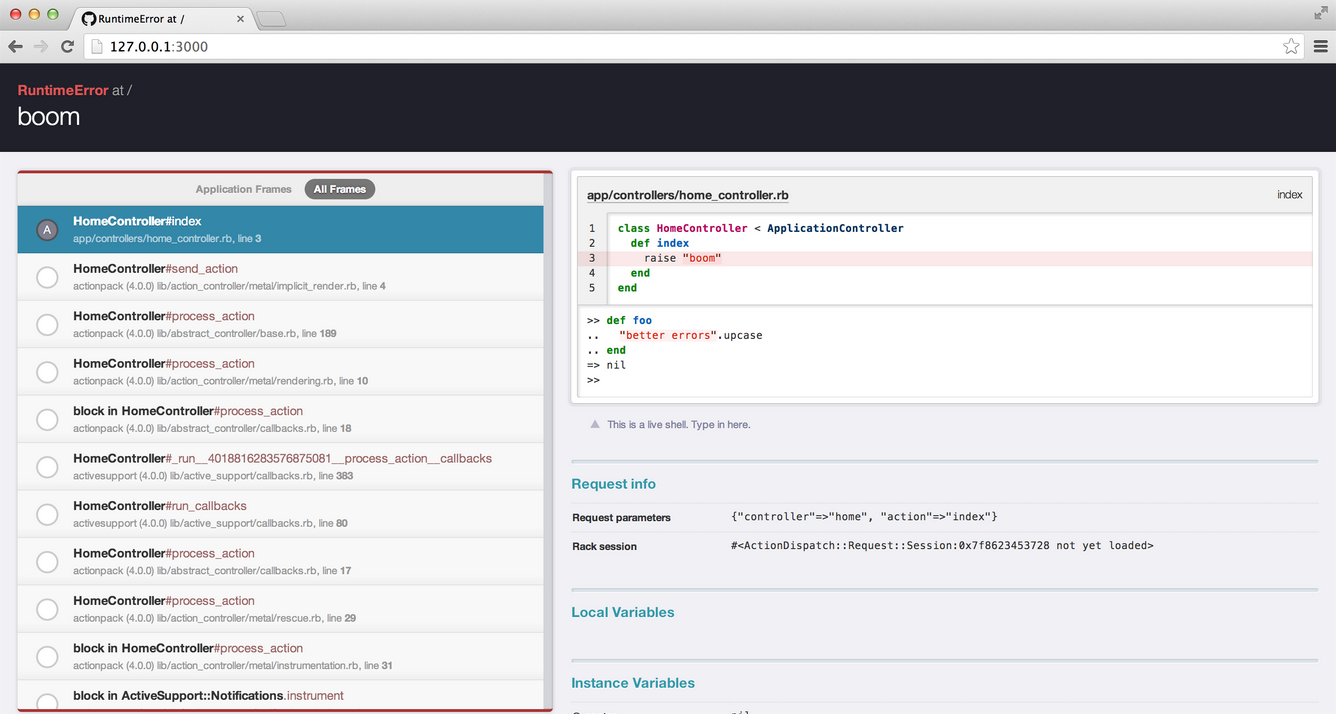
A running Rails server can provide a lot of useful information for debugging, especially if you curry it with the right helpers. Rails 4 already comes with some better error reporting and a route helper that can be accessed through navigating to an unknown route. I use the /routes path for this purpose:


Screen Shot 2013-10-16 at 13.04.18

This functionality can be improved with a nice UI and a mini Rails console running in your browser if you add Better Errors and the Binding of Caller gem. These tools allow you to dive right into the error context and find out what might have went wrong. Combining this with raising my own errors gives me a lot of flexibility to quickly get to the point where I assume that something fishy is going on in the code.


Screen Shot 2013-10-16 at 13.02.46

When you are doing a lot of ActionMailer related stuff, you probably want to install the Letter Opener gem to develop and inspect your E-Mails.

The debugger:

Having tools like Better Errors is super nice, but they are only suited for usage in the Browser. This is not always possible and I fall back to real debuggers that allow for moving around in the call-stack and inspecting objects at runtime.
The ruby-debug gem was the go-to-guy for a long time in Ruby land. It was a PITA to get this up and running in latest Ruby versions. That’s why I use the IRB replacement pry with a lot of extensions like pry-debugger or pry-nav. If you want to hook into a remote Rails process (ie. running rails via foreman) you can hook into it with pry-remote. Have a look at the Pry Railscast for more information.

Debugging through the console:

The console is very important for me when writing new or changing existing code. I often create new finders and scopes in the console directly. A very important command in the console is reload!. It reloads all the code in the current session, similar to what happens when you hit CTRL+R in the browser:

1
reload!; something_i_changed_in_the_editor.check_if_it_works

A thing that I find very helpful when stuck in a debugging session is the method.source_location functionality introduced in Ruby 1.9. It allows me to see where a method is defined:

1
2
user.method(:url).source_location
=> ["/Users/amit/Documents/rails/on_ruby/app/models/user.rb", 39]

I like to use pry-rails as my default Rails Console. It enables me to browse source code, inspect objects and do a lot of other crazy stuff. Just type help in a pry session to see what commands are available. My favorite command is wtf? which shows the last raised exception and stack-trace.

Debugging through testing:

I love test driven development! It is an everyday part of my programming routine. The only thing that I hate when doing TDD in Rails is the slow feedback loop. I don’t like using tools like spork or zeus as they introduce a lot of complexity and make debugging even harder.
So my approach to get away with minimal turnaround time is to start my new expectations by writing somthing like this:

1
2
3
4
5
describe User do
  it "does crazy stuff" do
    pry
  end
end

This rspec expectation will just open a new pry session where I can start coding right away, exploring my test with direct feedback from executing the code I want to test. This eliminates all the iteration- and startup time when running red/green cycles. It is especially useful when I don’t know exactly how something should function in the first place…

Debugging capybara:

The last pattern is super useful when writing acceptance tests in capybara! I always forget how to use capybara expectations and matchers, because I write only a few of those tests. This is mainly due to the test pyramid and me being a backend developer.
There are also a lot more moving parts in acceptance tests, especially when running JavaScript tests in a headless browser. It’s super useful when you can just check page.body or temper with X-PATH expressions directly in the pry session.
If there is some strange behavior during test execution, I just put a breakpoint somewhere in the test and call save_and_open_page or even better: print out current_url and open the running test instance directly in the browser!

Other helpful tools:

The Rails ecosystem comes with a lot of tools for debugging, but it can be enhanced even further:

Rails Panel:

If you are using Google Chrome like me, you can use the Rails Panel plugin in combination with the Meta Request gem to get a Rails Developer Console in your browser. Super sweet!
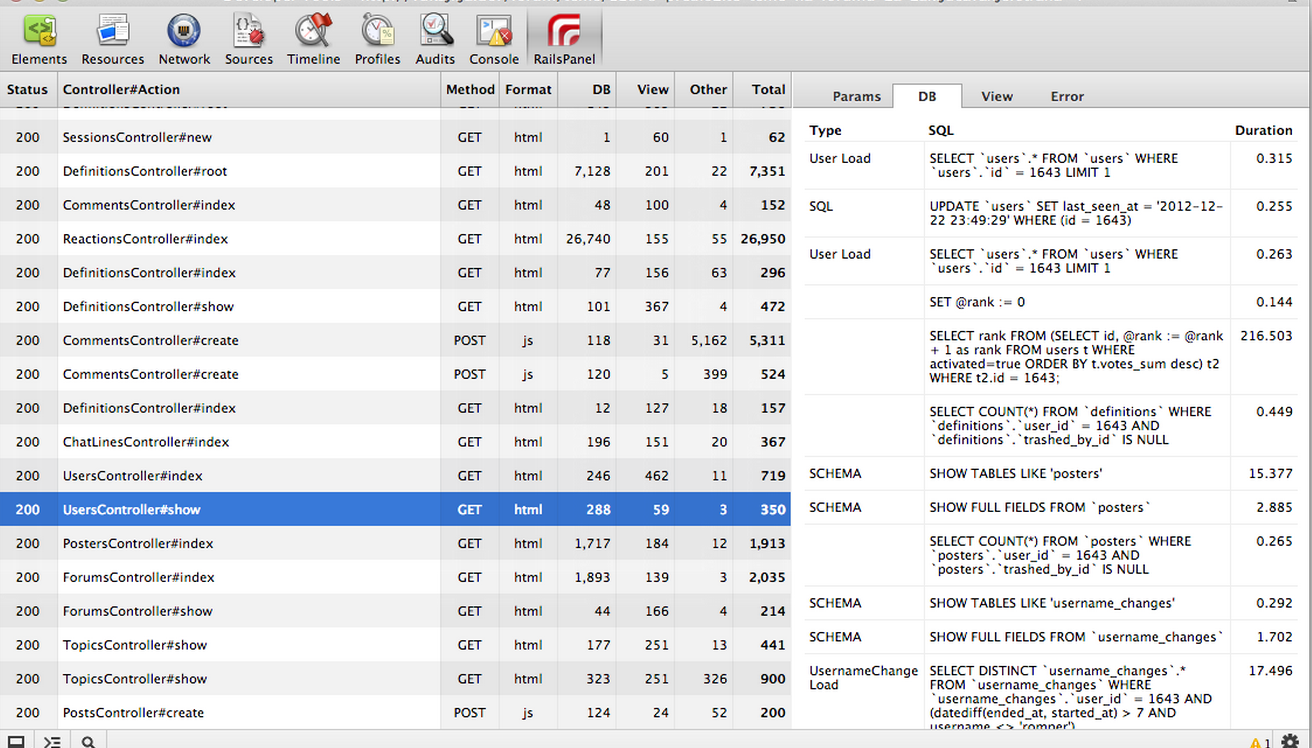
Screen Shot 2013-10-16 at 11.21.51


 cURL:


If I want to look into response headers or other request/response specific information, Use curl in addition to the Chrome Developer Tools:

1
2
3
4
curl -I "http://hamburg.onruby.dev:5000/"
 
HTTP/1.1 200 OK
[...]

It is even possible to use the “Copy as cURL” option in the Chrome Developer Tools to get all the parameters necessary to redo some request!

Navicat:


Use Navicat as a multi db frontend. It allows to inspect what is going on in the database, check query results, indices and create data on the fly. Always have a good client for your data stores available!

GIT:


Havent used git, but want to. It’s not the most self explanatory tool on the planet but it helps when debugging applications. Just one example here is using git bisect. It executes a command for a range of commits, so that it is possible to find out which commit introduced a problem.

Resources worth reading:

Here are some websites that I keep referring to in a lot of my answers on stackoverflow. Go ahead and check all of them, really, I mean it!

Monday, November 25, 2013

Installing Ruby, RVM, Rails, Mysql, Mysql-Query-Browser,Chrome browser, Aptana, Sublime all in one

First of all, we're going to run `sudo apt-get update` so that we have the latest sources on our box so that we don't run into any package-related issues, such as not being able to install some packages.
Next, we're going to install curl, which we'll use to fetch the RVM script:
 
`sudo apt-get install curl`
 

RVM

RVM is a Ruby Version Manager created by Wayne E. Seguin and is extremely helpful for installing and managing many different versions of Ruby all at once. Sometimes you could be working on a project that requires an older (1.8.7) version of Ruby but also need a new version (2.0.0) for one of your newer projects. This is a problem that RVM solves beautifully.
Another situation could be that you want to have different sets of gems on the same version of Ruby but don't want to have to do deal with Gem Conflict Hell. RVM has gemsets for this.

With curl installed we'll be able to install RVM with this command:
 
`curl -L get.rvm.io | bash -s stable --auto`

The beautiful part of this is that it installs RVM and Ruby to our home directory, providing a sandboxed environment just for us.
Then we'll need to reload the ~/.bash_profile file which we can do with this small command:

. ~/.bash_profile
 
The next command we run will tell us what other packages we need to install for Ruby to work:

`rvm requirements`
A couple of things to note in this is that the build-essential package is installed, which will install all the essential build tools for Ubuntu, so we'll be able to download and compile Ruby, amongst other things.
This will also install Git, which is a version control system tool that you should be using if you're not already. This is used by RVM to fetch the latest source for some versions of Ruby.

These packages will lessen the pain when we're working with Ruby. For example, the libssl-dev package will make OpenSSL support in Ruby work, libsqlite3-0 and libsqlite3-dev are required for the sqlite3-ruby gem and the libxml2-dev and libxslt-dev packages are required for the nokogiri gem.

Install all these packages now using this command:

`sudo apt-get install build-essential openssl libreadline6 libreadline6-dev \
curl git-core zlib1g zlib1g-dev libssl-dev libyaml-dev libsqlite3-dev sqlite3 \
libxml2-dev libxslt-dev autoconf libc6-dev ncurses-dev automake libtool bison  \
subversion pkg-config`


Ruby

With RVM and these packages we can install Ruby 1.9.3 or 2.0.0:
 
`rvm install 2.0.0`
 
Once it's done, we'll have Ruby 2.0.0 installed. To begin using it we can use this lovely command:
 
`rvm use 2.0.0`
 

 Are we using 2.0.0? You betcha:
 `ruby -v`
 ruby 2.0.0p247 (2013-06-27 revision 41674) [x86_64-darwin12.4.0]
 
To make this as a default ruby use the following command:  
 
`rvm --default use 2.0.0`
 
 
 As an additional side-note: Users can, and should, use a gemset when possible so that they don't pollute their 'default' which is what is selected when a gemset is not specified in either a project's .rvmrc, or at the command-line. Each installed Ruby has a '@global' gemset. This is used to share gems with other gemsets created under that specific Ruby, and with the 'default' gemset. This can be selected by running 'rvm gemset use global' and then installing the gems you wish to share to other gemsets including 'default'. You can, of course simply install in each gemset but this will cause needless duplication and use up more disk-space and bandwidth. 
 

Rails

Now that RVM and a version of Ruby is installed, we can install Rails. Because RVM is installed to our home directory, we don't need to use that nasty sudo to install things; we've got write-access! To install the Rails gem we'll run this command:
gem install rails -v 4.0.0
This will install the rails gem and the multitude of gems that it and its dependencies depend on, including Bundler.


MySQL

If you're planning on using the mysql2 gem for your application then you'll want to install the libmysqlclient-dev package before you do that. Without it, you'll get an error when the gem tries to compile its native extensions.

And that's it! Now you've got a Ruby environment you can use to write your (first?) Rails application in with such minimal effort.
 

Chrome Browser

Download the current stable version from here. After downloading the “.deb” file, open a terminal and move to the directory where the debian file is downloaded. For example, if the file is in Downloads use the below command to move to the Downloads directory.

`cd Downloads
 
After changing the directory, use the below command to install the google chrome from debian file. Type the password for the user when prompted.

`sudo dpkg -i google-chrome-stable_current_i386.deb`

 If you find any error and the installation fails because of dependency Then try using the below command, type the password for the user when prompted.

`sudo apt-get -f install`


If you still find error in installing the pkg, try looking your `/tmp` folder, you will find multiple pkgs installed. Choose the required one and dpkg again 

Thats it..!!


Aptana Studio 3

1. Install the prerequisites

`sudo apt-get install openjdk-7-jdk libjpeg62 libwebkitgtk-1.0-0 git-core`
 
Although Aptana Studio doesn’t officially support OpenJDK, I’ve not encountered any problems, however I’ve not done extensive testing. Alternatively, to use the Sun JDK, do the following:

sudo apt-get install libjpeg62 libwebkitgtk-1.0-0 git-core
sudo add-apt-repository ppa:webupd8team/java
sudo apt-get update
sudo apt-get install oracle-java7-installer 

libjpeg62 pkg is important, without it you will get errors.

2. Download Aptana Studio

You can download Aptana Studio 3 here. Select the “Standalone Version” if not selected and click download.

3. Extract **Aptana Studio**

sudo unzip [name of Aptana Studio ZIP file here].zip -d /opt
 
4. Add the menu shortcut

wget http://www.samclarke.com/wp-content/uploads/2012/04/AptanaStudio3.desktop
sudo mv AptanaStudio3.desktop /usr/share/applications/AptanaStudio3.desktop
  
 And you are done..!!!
If you prefer sublime over aptana, here's how to get it on your machine.

Sublime

After reading numerous blog posts about how to install Sublime Text 2 in Ubuntu, this is definitely the quickest way! Just paste the following lines into your Terminal:

sudo add-apt-repository ppa:webupd8team/sublime-text-2
sudo apt-get update
sudo apt-get install sublime-text
 
After running this, Sublime Text 2 has been installed within the /usr/lib/sublime-text-2 directory and can be launched from the Dashboard, or by typing subl, sublime-text or sublime-text-2 into a Terminal window.
 

Tuesday, November 19, 2013

Regular Expression Understanding

Stage1

Symbol             Explanation

^                       Start of string
$                       End of string
.                        Any single character
+                       One or more character
\                        Escape Special characters
?                       Zero or more characters

Input exactly match with “abc”
var A = /^abc$/;

Input start with “abc”
var B = /^abc/;

Input end with “abc”
var C = /abc$/;

Input “abc” and one character allowed Eg. abcx
var D = /^abc.$/;

Input  “abc” and more than one character allowed Eg. abcxy
var E = /^abc.+$/;

Input exactly match with “abc.def”, cause (.) escaped
var F = /^abc\.def$/;

Passes any characters followed or not by “abc” Eg. abcxyz12....
var G = /^abc.+?$/
 Stage 2

Char                Group Explanation

[abc]                 Should match any single of character
[^abc]               Should not match any single character
[a-zA-Z0-9]      Characters range lowercase a-z, uppercase A-Z and numbers
[a-z-._]              Match against character range lowercase a-z and ._- special chats
(.*?)                  Capture everything enclosed with brackets
(com|info)         Input should be “com” or “info”
{2}                   Exactly two characters
{2,3}                Minimum 2 characters and Maximum 3 characters
{2,}                  More than 2 characters


Put together all in one URL validation.
var URL = /^(http|https|ftp):\/\/(www+\.)?[a-zA-Z0-9]+\.([a-zA-Z]{2,4})\/?/;

URL.test(“http://amitonrails.blogspot.in”);     // pass
URL.test(“http://www.amitonrails.blogspot.in”);            // pass
URL.test(“https://amitonrails.blogspot.in/”);                   // pass
URL.test(“http://amitonrails.blogspot.in/2013/11/regular-expression-understanding.html”);    // pass
Stage 3

Short Form     Equivalent              Explanation

\d                      [0-9]                         Any numbers
\D                     [^0-9]                       Any non-digits
\w                     [a-zA-Z0-9_]            Characters,numbers and underscore
\W                    [^a-zA-Z0-9_]          Except any characters, numbers and underscore
\s                       -                                White space character
\S                      -                                Non white space character


var number = /^(\+\d{2,4})?\s?(\d{10})$/;  // validating phone number

number.test(1111111111);           //pass
number.test(+111111111111);     //pass
number.test(+11 1111111111);    //pass
number.test(11111111);               //Fail

Sunday, October 13, 2013

Closures in Ruby


Closures are anonymous functions with closed scope. I'll dive into each of these concepts in more detail as I go, but first, it's best to oversimplify. Think of a closure as a code block that you can use as an argument, with special scoping rules. I'll use Ruby to show how closures work. Listing 1 shows the simplest possible closure:

Listing 1. The simplest possible closure
3.times {puts "Inside the times method."}


Results:
Inside the times method.

times is a method on the 3 object. It executes the code in the closure three times. {puts "Inside the times method."} is the closure. It's an anonymous function that's passed into the times method and prints a static sentence. This code is tighter and simpler than the alternative with a for loop, shown in Listing 2:

Listing 2: Looping without closures
for i in 1..3 
  puts "Inside the times method."
end

The first extension that Ruby adds to the simple code block is an argument list. A method or function can communicate with a closure by passing in arguments. In Ruby, you represent the arguments with a comma-separated list of arguments, between || characters, such as |argument, list|. Using arguments in this way, you can easily build iteration into data structures such as arrays. Listing 3 shows an example of iterating over an array in Ruby:

Listing 3. Using closures with collections
['lions', 'tigers', 'bears'].each {|item| puts item}


Results: 
lions
tigers
bears

The each method is just one way to iterate. Often, you want to produce a new collection with the results of an operation. This method in Ruby is called collect. You may also want to join the contents of an array with some arbitrary string. Listing 4 shows such an example. These are just two more of the many ways that you can use closures to iterate.

Listing 4. Passing arguments to a closure
animals = ['lions', 'tigers', 'bears'].collect {|item| item.upcase}
puts animals.join(" and ") + " oh, my."

LIONS and TIGERS and BEARS oh, my.

In Listing 4, the first line of code takes each element of an array, calls the closure on it, and then builds a collection with the results. The second concatenates all of the elements into a sentence, with " and " between each one. So far, I've shown you nothing more than syntactic sugar. You can do all of these things in any language.
From the examples so far, you can see that an anonymous function is simply a function, without an name, that is evaluated in place and determines its context based on where it is defined. But if the only difference between languages with closures and those without were a little bit of syntactic sugar -- the fact that you don't need to declare the function -- there wouldn't be much debate. The advantages of closures go beyond saving a few lines of code, and the usage patterns go beyond simple iteration.
The second part of the closure is the closed scope, which I can best illustrate with another example. Given an array of prices, I'd like to generate a sales-tax table with each price and its associated tax. I don't want to hardcode the tax rate into the closure. I'd rather configure it somewhere. Listing 5 shows one possible implementation:

Listing 5. Using closures to build a tax table
tax = 0.08

prices = [4.45, 6.34, 3.78]
tax_table = prices.collect {|price| {:price => price, :tax => price * tax}}

tax_table.collect {|item| puts "Price: #{item[:price]}    Tax: #{item[:tax]}"}


Results:
Price: 4.45    Tax: 0.356
Price: 6.34    Tax: 0.5072
Price: 3.78    Tax: 0.3024

Before dealing with scoping, I should explain a couple of Ruby idioms. First, a symbol is an identifier preceded by a colon. Think of a symbol as a name for some abstract concept. :price and :tax are symbols. Second, you can easily substitute variable values inside strings. The sixth line takes advantage of this technique with puts "Price: #{item[:price]} Tax: #{item[:tax]}". Now, back to the scoping issue.
Look at the first and fourth lines of code in Listing 5. The first assigns a value to the tax variable. The fourth line uses that variable to compute the tax column of the price table. But this usage is in a closure, so this code actually executes in the context of the collect method! Now you have insight into the term closure. The scope between the name space of the environment that defines the code block and the function that uses it are essentially one scope: the scope is closed. This characteristic is essential. This closed scope is the communication that ties the closure to the calling function and the code that defines it.
Customizing with closures
You've seen how to use closures as a client. Ruby also lets you write methods that use your own closures. This freedom means the Ruby API can be more compact because Ruby doesn't need to define every usage model in code. You can build in your own abstractions as needed, with closures. For example, Ruby has a limited set of iterators, but the language gets along fine without them because you can build your own iterative concepts into your code through closures.
To build a function that uses a closure, you simply use the yield keyword to invoke the closure. Listing 6 shows an example. The paragraph function provides the first and last sentences of the output. The user can provide additional sentences with the closure.

Listing 6. Building methods that take closures
def paragraph 
  puts "A good paragraph should have a topic sentence."
  yield
  puts "This generic paragraph has a topic, body, and conclusion."
end

paragraph {puts "This is the body of the paragraph."}


Results:
A good paragraph should have a topic sentence.
This is the body of the paragraph.
This generic paragraph has a topic, body, and conclusion.

Advantages
You can easily take advantage of arguments within your custom closures by attaching a parameter list to yield, as in Listing 7:

Listing 7. Attaching a parameter list
def paragraph
  topic =  "A good paragraph should have a topic sentence, a body, and a conclusion. "
  conclusion = "This generic paragraph has all three parts."

  puts topic 
  yield(topic, conclusion) 
  puts conclusion
end


t = ""
c = ""
paragraph do |topic, conclusion| 
  puts "This is the body of the paragraph. "
  t = topic
  c = conclusion
end

puts "The topic sentence was: '#{t}'"
puts "The conclusion was: '#{c}'"

Be careful to get the scoping right, though. The arguments that you declare within the closure are local in scope. Listing 7, for example, works, but Listing 8 would not because the topic and conclusion variables are both local in scope:

Listing 8. Incorrect scoping
def paragraph
  topic =  "A good paragraph should have a topic sentence."      
  conclusion = "This generic paragraph has a topic, body, and conclusion."

  puts topic 
  yield(topic, conclusion) 
  puts conclusion
end


my_topic = ""
my_conclusion = ""
paragraph do |topic, conclusion|     # these are local in scope
  puts "This is the body of the paragraph. "
  my_topic = topic
  my_conclusion = conclusion
end

puts "The topic sentence was: '#{topic}'"
puts "The conclusion was: '#{conclusion}'"

Closures in practice
Some of the common closure scenarios are:
  • Refactoring
  • Customization
  • Iterating across collections
  • Managing resources
  • Enforcing policy
When you can build your own closures in a simple and convenient way, you find techniques that open up a whole new range of possibilities. Refactoring turns code that works into better code that works. Most Java programmers look for refactoring possibilities from the inside out. They often look for repetition within the context of a method or loop. With closures, you can also refactor from the outside in.
Customization with closures can take you in some surprising places. Listing 9, a quick example from Ruby on Rails, shows a closure that is used to code the response of an HTTP request. Rails passes an incoming request to a controller, which should generate the data the client wants. (Technically, the controller renders the result based on the contents the client sets in an HTTP accept header.) This concept is easy to communicate if you use a closure.

Listing 9. Rendering an HTTP result with closures
@person = Person.find(id)
respond_to do |wants|
  wants.html { render :action => @show }
  wants.xml { render :xml => @person.to_xml }
end

The code in Listing 9 is beautiful to look at, and with a quick glance, you can tell exactly what it does. If the request block is requesting HTML, it executes the first closure; if it's requesting XML, it executes the second. You can also easily imagine the implementation. wants is an HTTP request wrapper. The code has two methods -- xml and html -- that each take closures. Each method can selectively call its closure based on the contents of the accept header, as in Listing 10:

Listing 10. Implementation of the request
  def xml
    yield if self.accept_header == "text/xml"
  end
  
  def html
    yield if self.accept_header == "text/html"
  end

Iteration is by far the most common use of closures within Ruby, but this scenario is broader than using a collection's built-in closures. Think of the types of collections you use every day. XML documents are collections of elements. Web pages are a special case of XML. Databases are made up of tables, which in turn are made up of rows. Files are collections of characters or bytes, and often rows of text or objects. Ruby solves each of these problems quite well within closures. You've seen several examples of closures that iterate over collections. Listing 11 shows a closure that iterates over a database table:

Listing 11. Iterating through rows of a database
require 'mysql'

db=Mysql.new("localhost", "root", "password")
db.select_db("database")

result = db.query "select * from words"
result.each {|row| do_something_with_row}

db.close

The code in Listing 11 also shows another possible usage pattern. The MySQL API forces users to set up the database resource and close it using the close method. You could actually use a closure to do the resource setup and cleanup instead. Ruby developers often use this pattern to work with resources such as files. Using the Ruby API, you don't need to open or close your file or manage the exceptions. The methods on the File class handle that for you. Instead, you can use a closure, as in Listing 12:

Listing 12. Working with File using a closure
File.open(name) {|file| process_file(file)}

Closures have another huge advantage: they make it easy to enforce policy. For example, if you have a transaction, you can make sure that your code always brackets transactional code with the appropriate function calls. Framework code can handle the policy, and user code -- provided in a closure -- can customize it. Listing 13 shows the basic usage pattern:

Listing 13. Enforcing policy
def do_transaction
   begin
      setup_transaction
      yield
      commit_transaction
   rescue
      roll_back_transaction
   end
end

Closures with the Java language
The Java language does not formally support closures per se, but it does allow the simulation of closures. Primarily, you can use anonymous inner classes to implement closures. The Spring framework uses this technique for many of the same reasons that Ruby does. Spring templates, for persistence, allow iteration over result sets without burdening the user with details of exception management, resource allocation, or cleanup. Listing 14 shows an example from Spring's sample petclinic application:

Listing 14. Inner classes as a closure substitute
JdbcTemplate template = new JdbcTemplate(dataSource);
final List names = new LinkedList(); 
template.query("SELECT id,name FROM types ORDER BY name",
                           new RowCallbackHandler() {
                               public void processRow(ResultSet rs) 
                                     throws SQLException
                               {
                                  names.add(rs.getString(1));
                               } 
                            }); 


Think of the things Listing 14's programmer doesn't need to do:
  • Open a connection
  • Close the connection
  • Handle iteration
  • Process exceptions
  • Deal with database-independent issues
The programmer is free from these issues because the framework handles those problems. But anonymous inner classes give you only a loose approximation of closures, and they don't go as far as you need to go. Look at the wasted syntax in Listing 14. At least half of the example is overhead. Anonymous classes are like a bucketful of cold water that's spilled in your lap every time you want to use them. All of the extra effort in wasted syntax discourages their use. Sooner or later, you're going to quit. When language constructs are cumbersome and awkward, they don't get used. The dearth of Java libraries that effectively use anonymous inner classes make this problem manifest. For closures to be practical and prevalent in the Java language, they must be quick and clean.
In the past, closures were never a serious priority for Java developers. In the early years, the Java designers did not support closures because Java users were skittish about automatically allocating the variables on the heap without an explicit new. Today, a tremendous debate circulates around including closures into the base language. In recent years, practical interest in dynamic languages such as Ruby, JavaScript, and even Lisp has led to a groundswell of support for closures in the Java language. It looks like we'll finally get closures in Java 1.7. Good things happen when you keep crossing borders

source : http://www.ibm.com/developerworks

Make symbols with keyboard

HOW TO MAKE SYMBOLS WITH KEYBOARD
Alt + 0153..... ™... trademark symbol
Alt + 0169.... ©.... copyright symbol
Alt + 0174..... ®....registered ­ trademark symbol
Alt + 0176 ...°......degre ­e symbol
Alt + 0177 ...±....plus-or ­-minus sign
Alt + 0182 ...¶.....paragr ­aph mark
Alt + 0190 ...¾....fractio ­n, three-fourths
Alt + 0215 ....×.....multi ­plication sign
Alt + 0162...¢....the ­ cent sign
Alt + 0161.....¡..... ­.upside down exclamation point
Alt + 0191.....¿..... ­upside down question mark
Alt + 1.......☺....sm ­iley face
Alt + 2 ......☻.....bla­ck smiley face
Alt + 15.....☼.....su­n
Alt + 12......♀.....female sign
Alt + 11.....♂......m­ale sign
Alt + 6.......♠.....spade
Alt + 5.......♣...... ­Club
Alt + 3.......♥...... ­Heart
Alt + 4.......♦...... ­Diamond
Alt + 13......♪.....e­ighth note
Alt + 14......♫...... ­beamed eighth note
Alt + 8721.... ∑.... N-ary summation (auto sum)
Alt + 251.....√.....s­quare root check mark
Alt + 8236.....∞..... ­infinity
Alt + 24.......↑..... ­up arrow
Alt + 25......↓...... ­down arrow
Alt + 26.....→.....ri­ght arrow
Alt + 27......←.....l­eft arrow
Alt + 18.....↕......u­p/down arrow
Alt + 29......↔...left right arrow

Windows Run Commands

RUN Commands !

1. Accessibility Controls - access.cpl
2. Accessibility Wizard - accwiz
3. Add Hardware Wizard - hdwwiz.cpl
4. Add/Remove Programs - appwiz.cpl
5. Administrative Tools - control admintools
6. Automatic Updates - wuaucpl.cpl
7. Bluetooth Transfer Wizard - fsquirt
8. Calculator - calc
9. Certificate Manager - certmgr.msc
10. Character Map - charmap
11. Check Disk Utility - chkdsk
12. Clipboard Viewer - clipbrd
13. Command Prompt - cmd
14. Component Services - dcomcnfg
15. Computer Management - compmgmt.msc
16. Control Panel - control
17. Date and Time Properties - timedate.cpl
18. DDE Shares - ddeshare
19. Device Manager - devmgmt.msc
20. Direct X Troubleshooter - dxdiag
21. Disk Cleanup Utility - cleanmgr
22. Disk Defragment - dfrg.msc
23. Disk Management - diskmgmt.msc
24. Disk Partition Manager - diskpart
25. Display Properties - control desktop
26. Display Properties - desk.cpl
27. Dr. Watson System Troubleshooting­ Utility - drwtsn32
28. Driver Verifier Utility - verifier
29. Event Viewer - eventvwr.msc
30. Files and Settings Transfer Tool - migwiz
31. File Signature Verification Tool - sigverif
32. Findfast - findfast.cpl
33. Firefox - firefox
34. Folders Properties - control folders
35. Fonts - control fonts
36. Fonts Folder - fonts
37. Free Cell Card Game - freecell
38. Game Controllers - joy.cpl
39. Group Policy Editor (for xp professional) - gpedit.msc
40. Hearts Card Game - mshearts
41. Help and Support - helpctr
42. HyperTerminal - hypertrm
43. Iexpress Wizard - iexpress
44. Indexing Service - ciadv.msc
45. Internet Connection Wizard - icwconn1
46. Internet Explorer - iexplore
47. Internet Properties - inetcpl.cpl
48. Keyboard Properties - control keyboard
49. Local Security Settings - secpol.msc
50. Local Users and Groups - lusrmgr.msc
51. Logs You Out Of Windows - logoff
52. Malicious Software Removal Tool - mrt
53. Microsoft Chat - winchat
54. Microsoft Movie Maker - moviemk
55. Microsoft Paint - mspaint
56. Microsoft Syncronization Tool - mobsync
57. Minesweeper Game - winmine
58. Mouse Properties - control mouse
59. Mouse Properties - main.cpl
60. Netmeeting - conf
61. Network Connections - control netconnections
62. Network Connections - ncpa.cpl
63. Network Setup Wizard - netsetup.cpl
64. Notepad - notepad
65. Object Packager - packager
66. ODBC Data Source Administrator - odbccp32.cpl
67. On Screen Keyboard - osk
68. Outlook Express - msimn
69. Paint - pbrush
70. Password Properties - password.cpl
71. Performance Monitor - perfmon.msc
72. Performance Monitor - perfmon
73. Phone and Modem Options - telephon.cpl
74. Phone Dialer - dialer
75. Pinball Game - pinball
76. Power Configuration - powercfg.cpl
77. Printers and Faxes - control printers
78. Printers Folder - printers
79. Regional Settings - intl.cpl
80. Registry Editor - regedit
81. Registry Editor - regedit32
82. Remote Access Phonebook - rasphone
83. Remote Desktop - mstsc
84. Removable Storage - ntmsmgr.msc
85. Removable Storage Operator Requests - ntmsoprq.msc
86. Resultant Set of Policy (for xp professional) - rsop.msc
87. Scanners and Cameras - sticpl.cpl
88. Scheduled Tasks - control schedtasks
89. Security Center - wscui.cpl
90. Services - services.msc
91. Shared Folders - fsmgmt.msc
92. Shuts Down Windows - shutdown
93. Sounds and Audio - mmsys.cpl
94. Spider Solitare Card Game - spider
95. SQL Client Configuration - cliconfg
96. System Configuration Editor - sysedit
97. System Configuration Utility - msconfig
98. System Information - msinfo32
99. System Properties - sysdm.cpl
100. Task Manager - taskmgr
101. TCP Tester - tcptest
102. Telnet Client - telnet
103. User Account Management - nusrmgr.cpl
104. Utility Manager - utilman
105. Windows Address Book - wab
106. Windows Address Book Import Utility - wabmig
107. Windows Explorer - explorer
108. Windows Firewall - firewall.cpl
109. Windows Magnifier - magnify
110. Windows Management Infrastructure - wmimgmt.msc
111. Windows Media Player - wmplayer
112. Windows Messenger - msmsgs
113. Windows System Security Tool - syskey
114. Windows Update Launches - wupdmgr
115. Windows Version - winver
116. Wordpad - write

Thursday, October 10, 2013

MySql Database Replication

Below is the step by step procedure to create a database replication in MySql.

1 Configure The Master
First we have to edit /etc/mysql/my.cnf. or /etc/my.cnf We have to enable networking for MySQL, and MySQL should listen on all IP addresses, therefore we comment out these lines (if existant):
#skip-networking
skip-external-locking
bind-address=0.0.0.0
log-bin=mysql-bin.log
binlog-do-db=exampledb (database name)
server-id=1

Then we restart MySQL:
/etc/init.d/mysql restart


Create a user with replication privileges
GRANT REPLICATION SLAVE ON *.* TO 'slave_user'@'%' IDENTIFIED BY '<some_password>'; (Replace <some_password> with a real password!)
FLUSH PRIVILEGES;

Take dump of database(exampledb) and run command
SHOW MASTER STATUS
It will give you result like
---------------+----------+---
-----------+------------------+
| File | Position | Binlog_do_db | Binlog_ignore_db |
+---------------+----------+--------------+------------------+
| mysql-bin.006 | 183 | database name| |
+---------------+----------+--------------+------------------+
1 row in set (0.00 sec


Write down this information, we will need it later on the slave!
Then leave the MySQL shell:
quit;

2 Configure The Slave
On the slave we first have to create the sample database exampledb:
mysql -u root -p
Enter password:
CREATE DATABASE exampledb;
quit;

store databse dump on slave

Now we have to tell MySQL on the slave that it is the slave, that the master is 192.168.0.100, and that the master database to watch is exampledb. Therefore we add the following lines to /etc/mysql/my.cnf or /etc/my.cnf if file doesnot exists copy from other location

server-id=2
master-host=192.168.0.100(ip address of master host machine)
master-user=slave_user(user name)
master-password=secret (password)
master-connect-retry=60
replicate-do-db=exampledb (database name)

Then we restart MySQL:
/etc/init.d/mysql restart

Finally, we must do this:
mysql -u root -p
Enter password:
SLAVE STOP;
In the next command (still on the MySQL shell) you have to replace the values appropriately:
CHANGE MASTER TO MASTER_HOST=’master ip address’, MASTER_USER='slave_user', MASTER_PASSWORD='<some_password>', MASTER_LOG_FILE='mysql-bin.006', MASTER_LOG_POS=183;
• MASTER_HOST is the IP address or hostname of the master (in this example it is 192.168.0.100).
• MASTER_USER is the user we granted replication privileges on the master.
• MASTER_PASSWORD is the password of MASTER_USER on the master.
• MASTER_LOG_FILE is the file MySQL gave back when you ran SHOW MASTER STATUS; on the master.
• MASTER_LOG_POS is the position MySQL gave back when you ran SHOW MASTER STATUS; on the master.
Now all that is left to do is start the slave. Still on the MySQL shell we run
START SLAVE;
quit;
That's it! Now whenever exampledb is updated on the master, all changes will be replicated to exampledb on the slave. Test it!
 If you have any queries or didnt understood any step feel free to ask.